Intro to Node.js Part 2
The plan
- Review last session
- MVC overview
- APIs!!
Node REPL
Node REPL
- Read Evaluate Print Loop
- What happens when you type "node"!
- Use it to run JS
- AND you have access to your current node_modules
$ node
> 1 + 2
3
> const express = require('express');
...
> .exit
HTTP Server Basics: Request/Response
Examples of HTTP requests:
- GET
- PUT
- POST
- DELETE
- Behold the holy RFC for more about the HTTP protocol
And responses?
They're what you get back from a request 😎
Routes
"Routes" define how a server should respond to a certain request at a certain end point or path.
// app.<HTTP action>
app.get('/', function (req, res) {
  res.send('Hello World!');
});
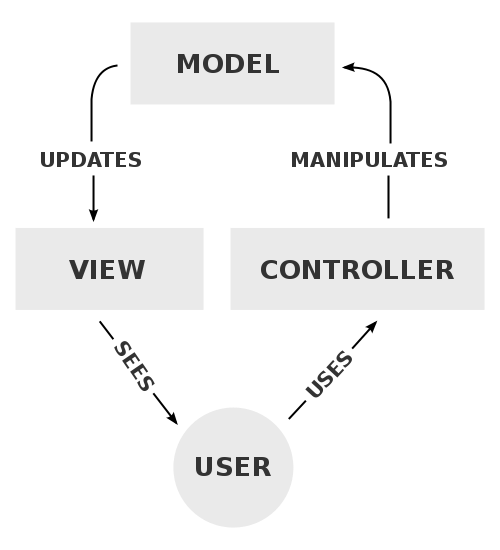
MVC
- Model: Data
- View: UI
- Controller: Switchboard

Controllers
Our controllers mediate communication between our models and views
Our Home Controller
exports.index = function (req, res) {
  res.send('Welcome to the GDI Node Workshop!');
}
Did you realize, our controller is a Node module?

Node Modules
A node module is a file, and it exposes things to the outside world with exports
Our Home Controller
exports.index = function (req, res) {
  res.send('Welcome to the GDI Node Workshop!');
}
How do we use a module?
var express = require('express');
// var nameWeUseInOurApp = require('someModule');
How our app integrates with our controller
// Tell app.js about the home controller using require
// Node how the ./ tells node to look in our own folder structure vs node_modules
var homeController = require('./controllers/home');

// Routes
app.get('/', homeController.index);
Let's Develop It!3
- Create a new
home.jsfile in acontrollersfolder. - Move your root route to
home.js - Update
app.jsto use your controller. - BONUS: Add a
/*route as a catch-all displays a 404 message. - BONUS: Create a new route in your home controller for
/about
Templates
Pass data through to your view
Tell our controller about templates
var path = require('path');

exports.index = function (req, res) {
  res.sendFile(path.join(__dirname, '../public', 'templates', 'index.html'));
}
What about CSS? And images?
We need to tell Express which files we allow the user to access
Add static files to our app
// Serve static files (i.e. images, scripts, styles, templates) from public/ directory
app.use(express.static('public'));
Let's Develop It!4
- Update your home controller to load a template,
index.html - Create a new route in your home controller for
/aboutif you haven't yet - Associate
/aboutwith a new template - Add static assets capability to your app
- BONUS: Add a CSS file and style your page!
Jade/Pug View Engine
Because writing HTML can be a lot! And view engines are great!
Check out Pug (formerly known as Jade)'s site for examples and an interactive playground
// template.pug
h1 Welcome
  a(href="somewhere.com") Some cool link!
Pug
Install & Use Pug
npm install --save pug
// in app.js
app.set('view engine', 'pug');
Pug
Use res.render to use your view engine
exports.about = function (req, res) {
  res.render('about');
}
How'd it get the file?
Since we put our about.pug file in views/ Express knows where that is and assumes that's what we mean when we say render
One more thing! Develop faster!
npm install --save-dev nodemon and update your package.json to use nodemon to run app.js. It will live reload so you don't have to start/stop your server!
Let's Develop It!5
- Install Pug
- Add some
.pugviews to aviewsfolder - Update your routes to use res.render
APIs!
Application Programming Interface
AKA computers talk to each other
APIs
APIs allow us to request data from a service
Some APIs you might want to use
- Meetup (api console)
We can also build our own!!
Let's Develop It!6
- Download our "database" of dinosaurs
- Create an api controller
- Present all the dinosaurs at
/api/all - Show a dinosaur based on its index in the dinosaurs array at
/api/get/:idwhere id is the index of the dinosaur - Consume your API to create a RDaaS (Random Dinosaur as a Service) page!
What we've learned in this course
- What is Node
- What is npm
- Used an npm module
- Built a web server
- Wrote a Node module
- Wrote an API endpoint
Where do we go from here?
THE END
Don't forget to take the end-of-class survey!
Exercise solutions at https://github.com/pselle/Intro-to-Node.js-Exercises